Home
Back From The Dead! (Again...)
04 Nov 2023In the last 8 years I’ve tried migrating this site off of Jekyll onto a static-site-generator written in a language I actually use multiple times. I’ve failed every single time. It turns out, the way I do things on this site with URLs, sitemaps, code samples, and SASS did not really fit into the way other (11ty) generators (Publish) worked. Most-recently I tried getting Publish to do what I wanted, because it’s written in Swift, but I was going to spend more time tweaking the generator than actually posting. So on to plan B!
MacOS has changed quite a bit since I last ran Jekyll, and it’s also two laptops later, so the Ruby environment has changed quite a bit. On top of that, so has Jekyll. I tried this amazing article to get Ruby setup in a sane way, but unfortunately I could not get an old-enough version of Ruby running on Ventura on an M1 for Jekyll version 2.5.3. So on to plan C!
Since I last updated this site Docker has become a thing, and it turns out, Docker is amazing at running old versions of software! Once I figured out how images and Dockerfiles worked, and I tried-out a dozen different pre-built images, I found REI’s Jekyll image, which actually had my exact last version of Jekyll on Dockerhub. Unfortunately, I couldn’t figure out how to add the titlecase gem to the image, so I was stuck again. But I did some snooping, and found a Jekyll Dockerfile on REI’s Github page, but it didn’t work because it did not have enough history to show the version of the Dockerfile I needed….
But it was enough to get me started creating a Dockerfile of my own, and I was finally able to make this:
Now, all I needed to do was put the Dockerfile in my Jekyll directory, build the image with docker build -t blog . and then run the following command and my site was building once again:
docker run --volume="$PWD:/data" -it blog jekyll build
So that’s it, EricDeLabar.com is back from the dead, it has dark mode, I updated About, Colophon, and Projects, and I marked a few articles as old. Next-up, a quick article on an annoying little SwiftUI “feature” (“quirk?” “bug?”) with iOS 16 and 17 keyboard toolbars!
HD Video to Blu-Ray and DVD Mac workflow
13 Nov 2015Disclaimer: Check the date! This post was written way back in 2015. Links could be dead or irrelevant. If there are technical things in here, they may be outdated, or there may be better ways to do them by now. You've been warned.
Since Apple killed iDVD with the on-board optical drive I’ve been looking for a way to archive HD video onto a optical disc for archival purposes. Streaming is nice, but I don’t have the disk space for dozens of multi-gig videos to just sit around until I’m feeling nostalgic, and I often need or want to share a video with multiple people who aren’t technically savvy enough to stream it to their TV. I present this simple Mac-based workflow to build a no-nonsense Blu-Ray or DVD with chapters.
This is not a free workflow, it’s probably possible to do it, but I’m going for easy, and if that means spending a few bucks I’m willing to do it. I use Toast 11 Titanium with the Blu-Ray plugin to burn (You can get Toast 14 Pro to do the same) on an OWC Mecury Pro Blu-Ray burner and a tool called mChapters from the App Store to set the chapter markers.
I edit in iMovie, usually on my Mac, but it also works great on my iPhone or iPad if that’s where the video is coming from. I prefer the Simple theme, but that’s personal preference. When I’m done editing, I export to a file. I set the resolution to the highest possible for the source clips, the quality to “High” and compress to “Better Quality.”
While the file is exporting I find my chapter times. In general, I set chapters to the center of each transition in my movie. As of the latest version of iMovie, you can find the time by setting the selection point in the middle of a transition and noting the time. The Simple theme uses a fade through black transition, so in general I grab the time for the black frame.
At this point we could move straight into Toast, but Toast 11’s chapter editor is terribly slow and hard to use. Roxio may have fixed it since, but I have version 11 so I set my chapters with mChapter. As a benefit, when the chapters are set on the file itself you don’t need to re-set them if you’re creating both a Blu-Ray and a DVD, which Toast 11 will make you do when you create a new project with a new disc type.
When the export is done I rename the file from the default .mp4 extension to .m4v. This is important, Toast will not read chapters from an mp4 file, but it will form an m4v. Open up the video in mChapters, go to the “Markers” menu and select “Add Text Track.” Set the Language of your video track to your language and the Language of the text track to the same, set the video track’s Chapter Reference to the name of your text track. (It defaults to “Text”.) Select the Text track, you’ll notice Chapter 1 is provided for you, leave it alone, you need a chapter 1 at timecode 00:00:00.0000 for everything to work.
Use the video preview and scrubber on the right to find the location of your next chapter marker. Notice the jump ahead/back 5 and 30 second buttons, these are useful. The » and « buttons jump about 1/100 of a second at a time, and you can hold them to fine-tune your selection. If you want to be extra-precise, the > and < buttons are there to enable it, but I generally don’t bother. The buttons are nice, but on a multi-touch trackpad a two-finger scroll is much faster and amzingly precise. I highly recommend it. Since the timecode from iMovie is only accurate to the second, it’s only good as a starting point, once I’m roughly there in the preview window I fine-tune by looking for the black frame in the middle of the fade-through-black transition.
Once you have the location for you chapter dialed in, press the + icon in the lower-left of the window. This sets the chapter. You can set the title if you want, I do to keep track of where I am in the file, but Toast 11 ignores it. Repeat this process until all of your chapters are set. At that point, save the file so your chapter track is included.
Open up Toast and select the disc type you’re planning on burning, Toast will convert the video appropriately, so you can burn a regular DVD with a 1080p m4v file. Drag you video file into Toast click the edit button for the video and verify that the chapters are set in the chapters tab, they should be. (You renamed the file to .m4v right?) Play with the menu and encoder settings if you like, I set the encoder to be the best quality, and generally use no menus.
When everything is configured the way I like I burn an image, this might be technical superstition dating back to the days of 1x DVD burners, but I always feel like I burn less coasters when starting with an image. Once the image is done, I archive it and the m4v file to my NAS and burn the disc from the image.
That’s it! Try it out before you burn multiple copies, but in general this works for me.
Expressiveness
11 Jun 2015In a reflective post yesterday Manton Reece of the Core Intuition podcast precisely summed up the concerns I’ve had since Apple’s announcement of Swift at WWDC 2014:
I also believe that a programming language can either encourage or discourage clever code based on the syntax it allows. I saw it with Ruby — programmers intent on fitting as much logic into a single line of code as possible. I think I see it with Swift as well, in operator overloading and maybe even a kind of rejection of Objective-C’s notorious verbosity. We’ll know for sure if we eventually see a Swift book in the pattern of JavaScript: The Good Parts.
Ruby developers like to call this fit-all-my-logic-in-one-line code “expressive.” Type less, do more; I would see the appeal 30 years ago when everyone was hacking on an 80-column terminal in emacs or vi. Today, we have powerful IDEs with code completion, snippets, and refactoring tools. I can write hundreds of characters of code in a handful of keypresses; and due to the beautiful verbosity of the Objective-C/Cocoa code we’re used to, it’s self documenting and easy to read by somebody new to the language/frameworks/app.
Don’t get me wrong, I enjoy the syntax of Swift, and I’m very happy with the way Apple is writing it in all of their WWDC 2015 slides. However, it’s the factions of the community at large that want to take it in a more “expressive” direction that worry me.
We’re half-way through this year’s WWDC I’ve finally resigned myself to the fact that after the Xcode 7 official release in the fall, I will be learning and using Swift in production code. Personally, I’m going to try and do it like a Objective-C developer, with self-documenting and beautifully-verbose syntax, but I hope I’m not alone.
8 Patterns to Help You Destroy Massive View Controllers
05 Feb 2015I’m a little late to the party on this one, but it has a few tips for creating smaller, more unit-testable view controllers.
View controllers become gargantuan because they’re doing too many things. Keyboard management, user input, data transformation, view allocation — which of these is really the purview of the view controller? Which should be delegated to other objects? In this post, we’ll explore isolating each of these responsiblities into its own object. This will help us sequester bits of complex code, and make our code more readable.
I’m a huge fan of smaller view controllers, and this objc.io article was always my go-to starting point. However, Soroush Khanlou’s 8 Patterns to Help You Destroy Massive View Controller is my new favorite step two. It covers 8 design patterns that help you break up your code into smaller, easier-to-understand chunks.
(I’ve just discovered Soroush’s site and his articles all look great; I think I’ll be spending a little time in his archives!)
CareEvolution is Hiring Devs and DevOps!
04 Feb 2015Disclaimer: Check the date! This post was written way back in 2015. Links could be dead or irrelevant. If there are technical things in here, they may be outdated, or there may be better ways to do them by now. You've been warned.
If you’d like to work with me and the other amazing people at CareEvolution, we have some new job postings up on StackOverflow Careers:
- Devs sought for Health Information Exchange (HIE) platform vendor at CareEvolution
- DevOps sought for Health Information Exchange (HIE) platform vendor at CareEvolution
Open to US Residents. The core codebase is C# but there’s a lot of JavaScript using Angular.js and a little iOS work as well. CareEvolution scores 11/12 on the Joel Test.
At some point in the process you may think to yourself, “Self, this is too good to be true. It can’t possibly be real.” I did the same thing. I expected a “but” for weeks, pinching myself every day. Now, I’m three-months in and I still haven’t found a “but” and I’m thrilled to go to work every day! (Oh, and by “go to work” I mean put on my slippers and wonder into my home office.)
I no longer work are CareEvolution, but it’s still a great company full of great people. They’re probably hiring, so please check them out!.
Organic UITableViews
03 Feb 2015Disclaimer: Check the date! This post was written way back in 2015. Links could be dead or irrelevant. If there are technical things in here, they may be outdated, or there may be better ways to do them by now. You've been warned.
I came across this nifty project on GitHub: mamaral/Organic.
A UITableViewController subclass designed with efficiency and maintenance in mind, and tries its best to handle just about everything for you.
No more if-statements and switches in every table view dataSource and delegate method. No more splitting up all the logic for each row and section into a dozen different methods, making addition, removal, or minor alterations to format and layout a headache. We feel your pain, we know the struggle. Moving one section of cells below another, moving cells between sections, adding new cells to existing sections, etc., with a decently-complex table view can be a nightmare, but with Organic it’s as simple as changing the order of objects in an array.
I’ll have to play with it to see if it fits in my current Interface Builder workflow; but looking at the sample code, it looks promising.
Illustrator for iOS Design
30 Jan 2015Disclaimer: Check the date! This post was written way back in 2015. Links could be dead or irrelevant. If there are technical things in here, they may be outdated, or there may be better ways to do them by now. You've been warned.
I’ve recently been working through a Lynda.com tutorial on Illustrator. It covered most of the tips in this article, but I found it to be a nice summary of how to setup your AI documents for pixel-perfect design.
If you want your designs to be tight and clean on device or on the web, then you’ll want to start your AI documents with these settings.
When you create a new document, make sure you are working in pixel units and have Align New Objects to Pixel Grid checked.
Then, in your General Settings, make sure your grid and keyboard increments line up to individual pixels.
Then if your keyboard increment is every 1px, you can be sure that you’re nudging on the pixel grid.
That’s not all. If you want things to be pixel perfect, you MUST make sure that Snap to Grid is checked. This is very important. If this isn’t checked, you may still get objects that sit on half a pixel (which will cause a fuzzy edge).
Read the full article “Designing with Illustrator: Tips and Tricks, Part I” over at the Big Nerd Ranch.
Relaunch on Jekyll
16 Jan 2015I guess Wordpress finally got fed up with me not updating my theme to the latest version; so the last upgrade finally killed the site. Luckily, a few months ago I had already re-started a Jekyll redesign I actually started a few years ago, back when Jekyll was new and popular. So, with a little polish and brand-new deploy script, here we are! (I’m not technically finished, but if I waited until I was, there’d still be a broken Wordpress install sitting here.)
If you haven’t noticed the header yet, I’m not really much of a web developer anymore, I’ve been concentrating mainly on iOS for the past 4 years or so, so that’s the new topic for this site. Like last time, I’m still most-interested in UI development, so expect to find articles about Interface Builder, Autolayout, Storyboards, and Animation. That is, if I actually manage to write anything.
This time around the site is fully-static, which means no comments. I kept any interesting comment threads from the past, but killed the rest. Sorry. (Not really.) If you’re interested, see the Colophon for details on what makes this site tick. There’s also an updated “About” page and a brand new “Projects and Code” page as well.
Fixing the Gist Embed Widget when Using Bourbon, Neat, and Bitters
04 Sep 2014Disclaimer: Check the date! This post was written way back in 2014. Links could be dead or irrelevant. If there are technical things in here, they may be outdated, or there may be better ways to do them by now. You've been warned.
As an avid user of Gist embeds, when I added the thoughtbot Sass frameworks Bourbon, Neat, and Bitters to this site, I was a bit disappointed when the widget display was a bit broken:
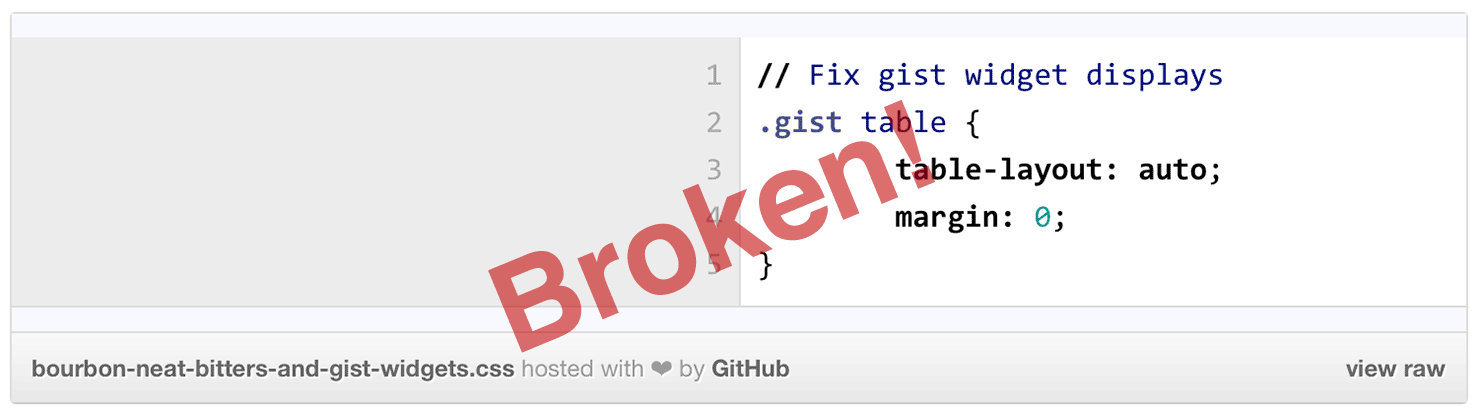
A bit of debugging and I found that the culprit was table-layout: fixed, which was included by Bitters. A quick patch in my main.scss file and we were all fixed: (As you can see by this working gist!)
Hope it helps somebody else. If you’d like to use progressively-enhanced Gist embeds in Jekyll like this site, check out my jekyll-gist-tag on Github! (Turn off javascript to see what this does.)
Hammering Screws: Programmers and Tool Blindness
19 Jun 2008Disclaimer: Check the date! This post was written way back in 2008. If there are technical things in here, they're more than likely outdated, or there may be better ways to do them by now. You've been warned.
 In my last post I told a half-truth by ending with
If you need me I’ll be uninstalling Eclipse.
Honestly, I only removed it from my laptop because
I rarely do any real Java development directly on my laptop, and should I need a quick code editor I have
TextMate which handles most of my coding needs pretty simply.
However, the commotion that the statement caused is what I’m going to address in this post.
If all you have is a hammer, everything looks like a nail.
–Bernard Baruch
To continue with my tools theme I’m going to address what I’ll call “tool-blindness,” the mentality that the tools you have and know how to use are perfect for every situation. In other words, if the tools you have require you to hammer screws then by-god you’re going to hammer screws.
Recently there has been a grass-roots, developer movement at my employer to switch from Ant to Maven. I love Maven, it’s leaps and bounds better than the way we were using Ant. (Notice I didn’t say Ant in general, I’m only planning on starting one holy-war with this post!) My last four projects have used Maven, and it makes the build and deploy process significantly easier, especially when it comes to dependancy management. However, everyone’s favorite Java IDE does not play well with Maven because Maven’s standard directory layout is significantly different from Eclipse’s convention. People have attempted to alleviate this problem by using the M2 plug-in and following the instructions here, but the result still feels like you’re forcing Eclipse to do something it doesn’t want to. Add that to the fact that the version of Eclipse we’re using crashes at least once a day, and you should be able to see why I’m looking for alternatives.
In short, our metaphorical hardware (the build process) has changed from nails to screws and our hammer (Eclipse) is no longer the best tool for the job. However, we’re still using the hammer because it’s what everyone knows how to use and only a few of us are not tool-blind enough to look for something else. It also doesn’t help that the alternatives that play nicely with Maven, namely IntelliJ IDEA and Textmate-and-a-shell are not “free as in beer.”
As I mentioned in the comments of my last post, Eclipse has been feeling a little more like this tool than this one. So maybe it’s time to ask which tool you really want on your tool belt.
In an interesting turn of events, Alex Vazquez over at Wufoo/Particletree is going through the same process with a different perspective. Alex is moving, based in part by recommendation and in part by language choice, from Java on Eclipse to PHP on Textmate, and he seems to be liking it so far. Alex does, however, sum up Eclipse rather nicely, and coincidentally within my theme:
The right development environment can save a programmer countless hours and is like a hammer in the carpenter’s tool belt. Since my background was in Java, my preference was for large sledge hammers and my development environment of choice was the de facto Java IDE Eclipse. It has a number of amazing features like autocomplete, refactoring and hundreds of plugins for every task imaginable. It’s no secret Java requires mountains of code, but Eclipse was made to move mountains.
–Alex Vazquez
I think Alex really nails (pardon the pun) the fact that if you’re going to be doing Java Enterprise
development you need an IDE that can handle it. You need something
that generates the code and provides the re-factoring tools and autocompletion to make it possible to
move mountains.
However I’d like to pose a question to all Java developers who use Eclipse; how much of
Eclipse do you really use? Besides re-factoring, code completion/generation, and cvs/svn/scm
integration, is there anything else you couldn’t live without? Anything else that Textmate doesn’t do?
(Besides run on Windows, we’ll save that tool for a different day.) Look at all of the stuff Eclipse does that
you don’t use, is the added bulk really worth it? How much memory is your Eclipse process using right now?
(Mine’s got ~254MB, 5x more than the next largest memory footprint, and my Eclipse
process is basically idle.) Just my two cents, please form your own opinions, after all
I’m just a kid who couldn’t possibly have any experience.